
UNIQR
API documentation
We are in open beta - Please report any issue to info@uniqr.us.
Welcome! If you're looking to start using our Picture-in-QR (PiQ) engine programmatically, you're in the right place. In this guide, you will learn to create PiQ codes by calling our POST API, and how its JSON input parameters can be changed to control the PiQ's design.
Along the way, we will discuss the most important aspect of PiQ generation: making sure they scan.
#1. Setup
First, to sign up for API access, use to the API Signup page.
Once you've signed up, Use the API Key Console to create a TEST key, and a PROD key. Make sure to store the tokens generated.
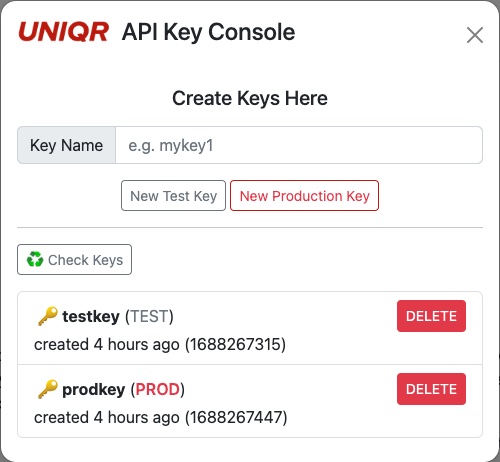
End State
As you see, each key is made of two tokens: the Identity Token and the Secret Token. Every request to our servers must carry a pair. Use your TEST key to make watermarked PiQ codes for free. When your application is ready to go live, configure it with your PROD key to create non-watermarked PiQ codes at $0.01/code.
#2.
Generating your first PiQ Code using curl
There is only one API at the moment: /img2qr-v0. It converts
images into PiQ codes. Here's a fully working curl command that:
-
Makes an HTTP POST request to
/img2qr-v0, asking for the image hosted athttps://d1vszaepne0bbq.cloudfront.net/rsc/portrait3.jpgto be converted into a PiQ code. - Extracts the returned base64-encoded PNG data of the PiQ code from the response (you will need jq available from your command line).
- Decodes the base64 data into binary and writes it to a PNG file in your home directory.
- Remember to fill in your "identity" and "secret" tokens!
curl -X POST -H "Content-Type: application/json" -d \
'{
    "img-url":"https://d1vszaepne0bbq.cloudfront.net/rsc/portrait3.jpg",
    "scan-url": "https://google.com",
    "identity": "<Your Identity token>",
    "secret": "<Your Secret token>",
    "scan-cfg": {
        "scanstr":1,
        "errcorr":-1,
        "dotsz": -1,
        "camo": -1
    }
}' https://api.uniqr.us/img2qr-v0 | jq -r '.b64' | base64 --decode > ~/uniqr.png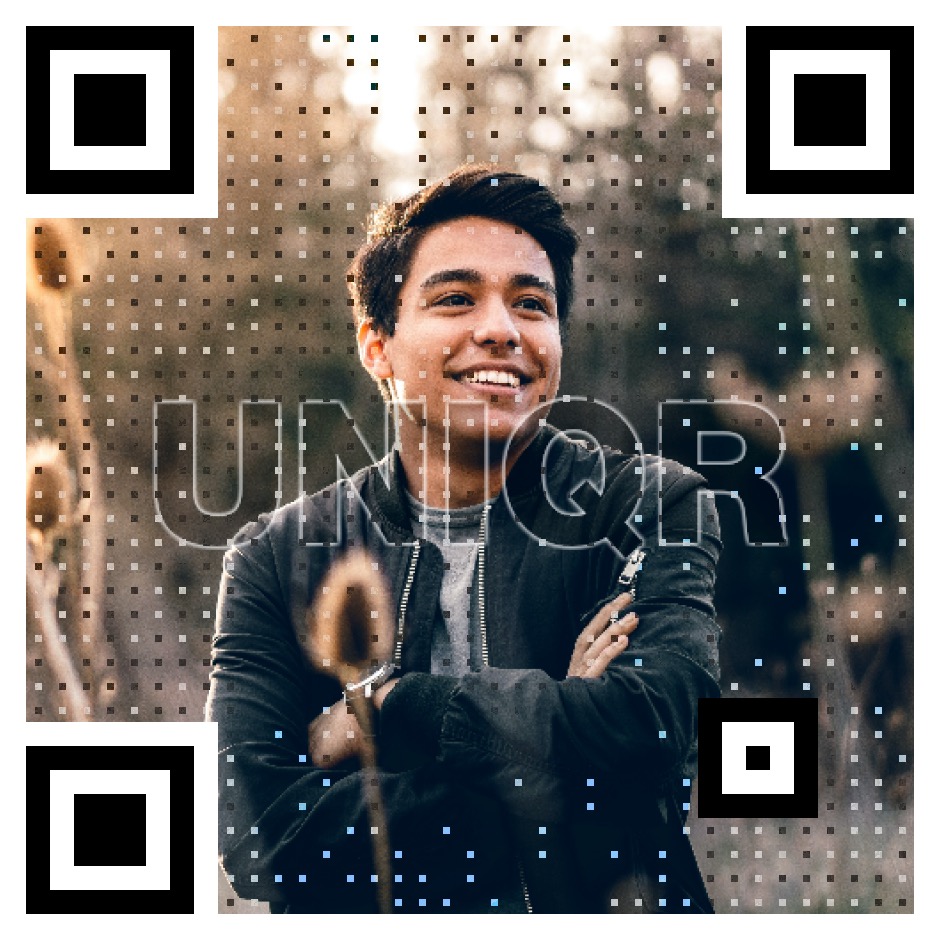
Expected content of the resulting file (uniqr.png)
As you can see, it's a simple POST API. Here's an annotated version of the JSON input:
{
    "img-url":"https:// ... portrait3.jpg", # URL of image to be converted to PiQ.
    "scan-url": "https://google.com",       # URL that the PiQ should link to.
    "identity": "<Your Identity token>",
    "secret": "<Your Secret token>",
    "scan-cfg": {                           # Scannability configuration
        "scanstr":1,
        "errcorr":-1,                       # Error correction: 0,1,2,3
        "dotsz": -1,
        "camo": -1
    }
}
You can specify the input image in two ways:
-
By providing a URL that hosts a PNG/JPG image in the field
'img-url', or -
By providing the base64-encoded string of a PNG/JPG directly, in the field
'img-src'.
#3.
Scannability (scan-cfg)
The key tradeoff with img2qr is between Scannability and Image Clarity: optimizing
scan-cfg for clearer images means fewer pixels left to paint the QR code, and vice versa.
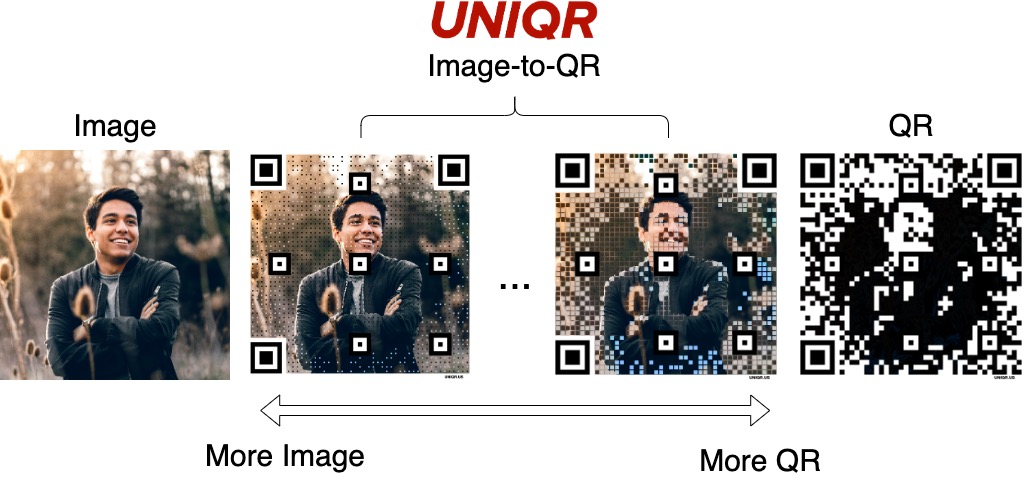
img2qr offers 3 parameters that control this tradeoff:
-
errcorrdetermines the Error Correction level, as defined in the QR code specification.- Valid values are 0, 1, 2 and 3.
- 0 corresponds to level L (low), where 7% of data bytes can be restored.
- 1 corresponds to level M (Medium), where 15% of data bytes can be restored.
- 2 corresponds to level L (Quartile), where 25% of data bytes can be restored.
- 3 corresponds to level L (High), where 30% of data bytes can be restored.
-
dotszis the Dot Size, defined as a fraction of a QR code "block". Valid values are 0, 1, 2, 3, 4, 5, each corresponding to 20%, 25%, 30%, %50, 80%, and 100% of the full pixel, respectively. -
camois the Camouflage, which allows dots to blend against their background. There are 3 levels of strength for this effect, which correspond to the 3 valid values: 0, 1, and 2.
TL;DR
The easiest way to navigate this tradeoff is the 'scanstr' field. This correlates with the
"EasyScan" parameter in our web PiQ Customizer, which gives you 4 levels of scannability using a
single value (valid values: 0, 1, 2, 3).
Please note that you can either use only 'scanstr', or you must specify all of the other
fields.
# when using scanstr, the other fields must be specified as -1
"scan-cfg": {
    "scanstr":1,
    "errcorr":-1,
    "dotsz": -1,
    "camo": -1
}

# when not using scanstr, set to -1
"scan-cfg": {
    "scanstr":-1,
    "errcorr":2,
    "dotsz": 3,
    "camo": 2
}
#4.
Customization (custom)
The optional custom parameter can be used to customize the looks of the PiQ Code.
Another working curl example:
 curl -X POST -H "Content-Type: application/json" -d \
  '{
    "img-url": "https://d1vszaepne0bbq.cloudfront.net/rsc/highres.jpg",
    "scan-url": "https://google.com",
    "identity": "<Your Identity token>",
    "secret": "<Your Secret token>",
    "scan-cfg": {
      "scanstr": -1,
      "errcorr": 2,
      "dotsz": 1,
      "camo": 2
    },
    "custom": {
      "frame": { "R": 204, "G": 192, "B": 176, "A": 255},
      "signature": "mydomain.com",
      "dot-shape": 0,
      "seethru": true,
      "res": 0
    }
  }' https://api.uniqr.us/img2qr-v0 | jq -r '.b64' | base64 --decode > ~/uniqr-custom.png

Expected content of the resulting file (uniqr-custom.png)
Parameter breakdown
Let's look at the custom parameter in detail:
"custom": {
  "frame": { "R": 204, "G": 192, "B": 176, "A": 255},
  "signature": "mydomain.com",
  "dot-shape": 0,
  "seethru": true,
  "res": 0
}
-
frameis the color of the "frame," specified in RGBA format. -
signatureis a short string drawn into the bottom right margin of the code. It's useful as an alternative way for your PiQ code to identify with potential scanners. (Note: As it stands, longer strings are truncated - please reach out if you need this issue resolved.)
Signature, magnified
-
dot-shapeoffers 3 shapes of QR dotting (reminder: size of dots are controlled byscan-cfgparameter).- Valid values are 0, 1, and 2.
- 0 = square dotting
- 1 = circular dotting
- 2 = "brush" dotting

Square dotting (default)

Circular dotting

Brush dotting
-
seethruis a boolean field. Setting this to true enables "see-through eyes," where the positioning squares ( AKA "eyes" ) are made translucent, allowing details of the picture to bleed through.
See-through eyes
-
resis the resolution of the output image. All output resolutions have a 1:1 aspect ratio.- Valid values are 0, 1, and 2.
- 0 = 940px
- 1 = 1248px
- 2 = 1960px
I want RGB-colored eyes , instead of See-Through.
Easy! Here's an example:
"custom": {
  "frame": { "R": 204, "G": 192, "B": 176, "A": 255},
  "dot-shape": 0,
  "seethru": false,
  "tl-eye": { "R": 204, "G": 192, "B": 176, "A": 255},
  "tr-eye": { "R": 204, "G": 192, "B": 176, "A": 255},
  "bl-eye": { "R": 204, "G": 192, "B": 176, "A": 255},
  "alm-eye": { "R": 60, "G": 120, "B": 50, "A": 255},
  "res": 0
}

Color eyes - note the alignment eye marked in a different color (green).

Higher "version" QR codes have multiple alignment eyes.
-
seethrumust be set tofalsebefore you can control the individual eye colors. -
There are four parameters, for each eye. All take RGBA color values as inputs.
-
"tl-eye"= top left eye. -
"tr-eye"= top right eye. -
"bl-eye"= bottom left eye. -
"alm-eye"= "alignment" eyes. Alignment eyes are the smaller eye in the bottom right corner.
-
Please note: the eye colors play a crucial role in the scannability of a QR code. Most QR code scanners expect dark-colored eyes against a light-colored frame. Having sufficient color contrast between the eyes and the frame is the #1 requirement for reliably-scanning QR codes.
However, if you need to invert this (you need dark-colored frame and light-colored eyes), you must specify
an additional parameter. Set "invert": true in "custom".
#5.
URL length and QR data capacity (version)
The data capacity of a PiQ Code depends on two things:
(In general, shorter URLs lead to both better scanning performance, and clearer images)
-
Version (Wikipedia)
determines
the "logical size" of the code, i.e. the number of dots in the QR code. There are 40 possible versions,
from 1 to 40. Both our web PiQ Customizer and API use version
5as the default value (we recommend sticking to 5-7). Higher versions have larger data capacity, but their scanning performance is worse (shorter scanning distance, higher requirement on camera resolution and lighting to scan reliably).
Version 2

Version 4

Version 7
- Error correction, as introduced in the "Scannability" section, controls the level of redundancy in the QR code. Higher error correction trades away data capacity for better Scanning performance.
The table below shows the data capacity of PiQ codes in bytes, from versions 5-9.
| Version / Error Correction | L (7% EC) | M (15% EC) | Q (25% EC) | H (30% EC) |
|---|---|---|---|---|
| v5 (default) | 108 | 86 | 62 | 46 |
| v6 | 136 | 108 | 76 | 60 |
| v7 | 156 | 124 | 88 | 66 |
| v8 | 194 | 154 | 110 | 86 |
| v9 | 232 | 182 | 132 | 100 |
TL;DR - what's the guidance on URL length?
Using our default QR code size (version 5) and recommended Error Correction level (at
least 15%), the PiQ code can carry at max 86 bytes of data. However, we recommend keeping the URL
smaller
than 50% of the limit (about 40-50 characters), as our algorithm uses spare data capacity to improve image
clarity.